PostHog Webhook Setup
Step-by-step guide to connecting PostHog events to Hogsend via the Destinations pipeline. With screenshots.
Already using hogsend init?
If you set up Hogsend via hogsend init, PostHog is already connected. The CLI created a webhook destination in your PostHog project with the correct URL, auth headers, and event matchers. You can skip this guide unless you want to customize the setup.
Overview
This guide walks you through connecting your PostHog instance to Hogsend manually using PostHog's Destinations pipeline. Once set up, the PostHog events you select will automatically flow into Hogsend and trigger your lifecycle journeys.
There are two approaches:
- HTTP Webhook Destination (recommended) — send specific events from PostHog to Hogsend's webhook endpoint. You pick exactly which events to forward.
- PostHog Workflows — a newer automation builder that gives you more filtering logic before events are sent. More powerful but more complex to set up.
For most teams, Option 1 is the right starting point. You can always add Workflows later.
Don't forward everything. PostHog captures a lot of events — $pageview, $autocapture, $feature_flag_called, etc. You only want to send the 5-15 events that your journeys actually care about.
Option 1: HTTP Webhook Destination
This is the fastest path. You create a webhook destination in PostHog that sends selected events to Hogsend's POST /v1/webhooks/posthog endpoint.
Here's the full setup flow:
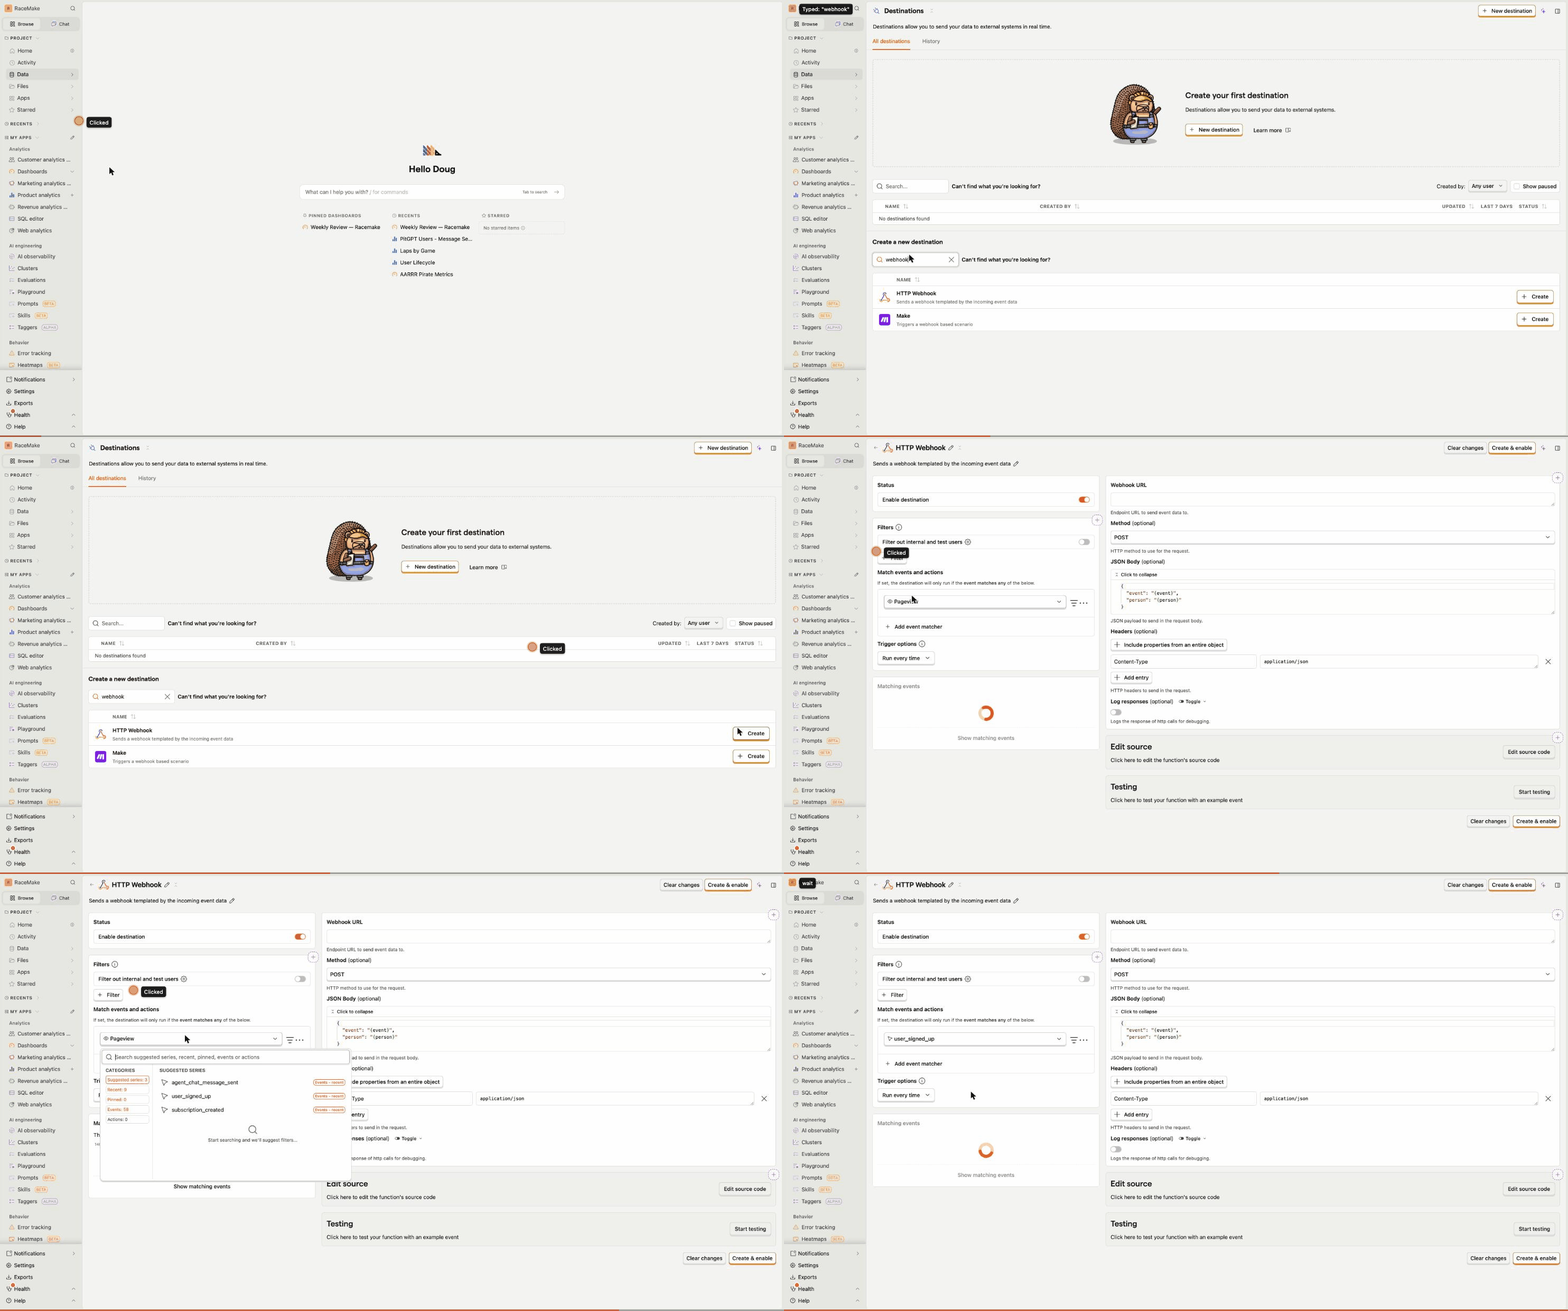
Step 1: Open Data > Destinations
In your PostHog dashboard, click Data in the left sidebar, then select Destinations under the Pipeline section. This is where PostHog manages all outbound data integrations.
Step 2: Search for "HTTP Webhook"
In the "Create a new destination" section at the bottom, use the search box to find HTTP Webhook. Click + Create to open the configuration form.
Step 3: Configure the webhook
You'll see a two-column form. Here's what to set:
Right column — Webhook settings:
| Field | Value |
|---|---|
| Webhook URL | https://your-hogsend-api.com/v1/webhooks/posthog |
| Method | POST (default) |
| JSON Body | Leave the default — it sends {event} and {person} which is exactly what Hogsend expects |
Headers — Add the auth secret:
The form already has a Content-Type: application/json header. Click + Add entry to add your webhook secret:
| Header | Value |
|---|---|
x-posthog-webhook-secret | The value you set as POSTHOG_WEBHOOK_SECRET in your Hogsend environment |
Step 4: Add event matchers (critical)
This is the most important step. Do not skip this.
In the left column under "Match events and actions," click + Add event matcher. A dropdown appears where you can search and select specific PostHog events.
Without event matchers, the destination fires on every PostHog event. On a real project, that's thousands of events per day — $pageview, $autocapture, $pageleave, etc. — none of which your journeys need.
With a user_signed_up event matcher selected, the matching events counter drops from 15,104 triggers (all events) to 17 triggers (just signups) over the same 7-day window. That's the difference between hammering your Hogsend API with noise and sending exactly what matters.
Add one matcher per event you care about. Click + Add event matcher multiple times to add several:
Step 5: Choose your starter events
These are the events most lifecycle journeys need. Add matchers for whichever ones exist in your PostHog project:
| Event | Journeys it powers |
|---|---|
user_signed_up | Welcome sequence, onboarding nudges |
user_activated | Activation branching (skip nudge if already activated) |
feature_used | Feature adoption flows |
trial_started | Trial-to-paid conversion |
subscription_created | Post-purchase onboarding |
subscription_cancelled | Churn recovery, win-back |
payment_failed | Payment failure recovery |
payment_succeeded | Exit condition for payment recovery journeys |
checkout_abandoned | Abandoned checkout recovery |
You don't need all of these on day one. Start with 3-4 events that match the journeys you're building, and add more as you go.
Your PostHog event names might differ — $signup instead of user_signed_up, for example. Use whatever names exist in your PostHog project. Hogsend uses the event name as-is.
Step 6: Enable and create
Toggle Filter out internal and test users on if you want to skip events from your team (recommended for production).
Leave Trigger options on "Run every time" unless you have a reason to throttle.
Click Create & enable. The destination is immediately active — the next time one of your matched events fires in PostHog, it'll hit Hogsend.
Step 7: Verify it's working
Send a test event from your app (or use PostHog's "Start testing" button on the destination page). Then check Hogsend:
# Check if the event arrived
curl -H "Authorization: Bearer $ADMIN_API_KEY" \
  "https://your-hogsend-api.com/v1/admin/events?limit=5"
You should see the event in the response. If not, check:
- Is the webhook URL correct? (including the
/v1/webhooks/posthogpath) - Is
POSTHOG_WEBHOOK_SECRETset in your Hogsend environment? - Does the header name match exactly:
x-posthog-webhook-secret? - Is the Hogsend API running and reachable from the internet?
Option 2: PostHog Workflows
PostHog Workflows (from the Laudspeaker acquisition) is a newer automation builder. It lets you set up more complex routing logic — filter events by properties, add delays, branch on conditions — before sending to a webhook.
This is useful when:
- You want to filter events by properties before they reach Hogsend (e.g., only send
subscription_createdevents for the "pro" plan) - You want to throttle or deduplicate events at the PostHog level
- You're already using Workflows for other automations and want to keep everything in one place
For most Hogsend setups, the HTTP Webhook Destination (Option 1) is simpler and gives you everything you need. Hogsend's journey trigger.where conditions can handle property-level filtering, so you typically don't need PostHog Workflows for that.
If you do want to use Workflows, the setup is similar: create a workflow triggered by specific events, add any filtering conditions you need, and use an HTTP action step to POST to https://your-hogsend-api.com/v1/webhooks/posthog with the same JSON body and headers.
The JSON body PostHog sends
For reference, this is what PostHog's HTTP Webhook destination sends to Hogsend. The default body template uses {event} and {person} placeholders that PostHog expands:
{
  "event": {
    "uuid": "01234567-89ab-cdef-0123-456789abcdef",
    "event": "user_signed_up",
    "distinct_id": "user_abc123",
    "timestamp": "2025-01-15T10:30:00.000Z",
    "properties": {
      "plan": "pro",
      "source": "landing-page",
      "$browser": "Chrome",
      "$os": "Mac OS X"
    }
  },
  "person": {
    "id": "person-uuid",
    "properties": {
      "email": "[email protected]",
      "name": "Alice",
      "plan": "pro"
    }
  }
}
Hogsend's built-in PostHog webhook source transforms this into:
| PostHog field | Hogsend field |
|---|---|
event.event | Event name (user_signed_up) |
event.distinct_id | userId |
person.properties.email | userEmail |
event.properties + person.properties | Merged into properties |
event.uuid | Preserved as properties._posthogEventId |
Troubleshooting
Events aren't arriving in Hogsend
- Check PostHog's History tab — go to Data > Destinations, click the History tab. You should see successful deliveries. If you see errors, the webhook URL or auth is wrong.
- Check your event matchers — if no matchers are added, all events fire (but that might be hitting a rate limit). If matchers are added, make sure they match the exact event names in your PostHog project.
- Check CORS / networking — your Hogsend API must be reachable from PostHog's servers. If you're running locally, PostHog can't reach
localhost.
Too many events hitting Hogsend
Add event matchers (Step 4 above). Without them, PostHog sends everything — including $pageview, $autocapture, and other high-volume internal events.
Events arrive but journeys don't trigger
The event name must exactly match the trigger.event in your journey metadata. PostHog event names are case-sensitive. Check that your journey's trigger event matches what PostHog sends (e.g., user_signed_up not user:signed_up).
Person email is missing
Hogsend reads the email from person.properties.email. If this isn't set in PostHog, Hogsend can track the event but can't send emails. Make sure you set email as a person property in PostHog early (typically on signup).